Getting Started
The source code of DarkProp is released under the MIT license and hosted on http://yfzhou.itp.ac.cn/darkprop.
If you use DarkProp in your publications, please cite our paper [1]:
@article{Xia:2021vbz,
    author = "Xia, Chen and Xu, Yan-Hao and Zhou, Yu-Feng",
    title = "{Production and attenuation of cosmic-ray boosted dark matter}",
    eprint = "2111.05559",
    archivePrefix = "arXiv",
    primaryClass = "hep-ph",
    doi = "10.1088/1475-7516/2022/02/028",
    journal = "JCAP",
    volume = "02",
    number = "02",
    pages = "028",
    year = "2022"
}
For bug reports, please contact Chen Xia (xiachen1996@outlook.com).
Installation
DarkProp provides an executable application darkprop based on the darkprop C++ library.
The darkprop application reads a TOML configuration file as input and
stores outputs in HDF5 format. The numerical calculations
require GSL library, and the simulation is
parallelized using MPI.
The spdlog library is used for logging.
Above mentioned dependencies and the build tools (cmake>=3.20, g++/clang with C++17
support) are required to build the application. They are available in the repositories of
mainstream Linux distributions and from homebrew for macOS, for example
Ubuntu 22.04+
$ sudo apt install g++ cmake libgsl-dev libhdf5-mpi-dev libspdlog-dev
Fedora 33+
  $ sudo dnf install g++ cmake mpich-autoload gsl-devel hdf5-mpich-devel spdlog-devel
  $ source /etc/profile
macOS (arm64)
$ brew install cmake gsl hdf5-mpi spdlog
The source code of the yuc::config tool for parsing TOML configurations and the
indicators library for showing progress bar have
been included in the source.
After installing the dependencies, darkprop can be build with cmake as follows.
Get into the source
$ tar -xzvf darkprop-vX.Y.Z.tar.gz
$ cd darkprop-vX.Y.Z
$ mkdir build; cd build
Configure
$ cmake ..
Build and install
$ cmake --build . --target install
The default location of installation may require root privilege, in which case the last
step should be run with sudo. Custom location can be specified by setting
-DCMAKE_INSTALL_PREFIX at the configuration step, e.g.
$ cmake -DCMAKE_INSTALL_PREFIX=/path/to/a/location ..
In this case, you may need to add the /path/to/a/location/bin path to the PATH
environment variable to make the darkprop command available.
Usage
The darkprop application can be launched as follows,
$ darkprop config.toml
or in parallel
$ mpiexec -n 4 darkprop config.toml
where 4 is the number of CPU cores for parallel simulation. It can be replaced with any other number that fits your machine. config.toml is the configuration file. A complete example can be found in the app directory, and description of the parameters are detailed in Input and Output section.
The crossing events at underground surfaces will be stored in a directory specified in the
config.toml file. The reconstruction of the underground DM flux is described in the
paper [1] and is currently implemented separately with Python. See the Example section
below.
Example
Here we give an example of the attenuation of isotropic CRDM flux.
This example can be found in the examples/crdm-isotropic directory of the source code.
First, cd into the directory and run the simulation
$ mpiexec -n N darkprop config_crdm.toml
The content of the configuration file config_crdm.toml is shown below
id = "crdm"

[input]
dm_model = "SIHelm"
medium_model = "HomoEarth"
type = "flux"
mchi_file = "./mchi.txt"
sigma_file = "./sigma.txt"
[input.flux]
flux_file = "./surface_flux.txt"

[output]
outdir = "./out"
maximal_simulation = 100_000_000
sample_size = 10_000_000
depth = [1.4]  # [km]
chunk_size = 10000  # hdf5 chunk size
full_tracks = 0
[output.log]
screen_log_lag = 10000

[numerical]
random_seed = 1
interp_Tmin = 1e-20
interp_num = 10000
After waiting about 20 core hours,
Then the underground flux can be reconstructed using the Python script analysis.py
$ python3 analysis.py
which requires Python packages, numpy, scipy, h5py, and matplotlib. The
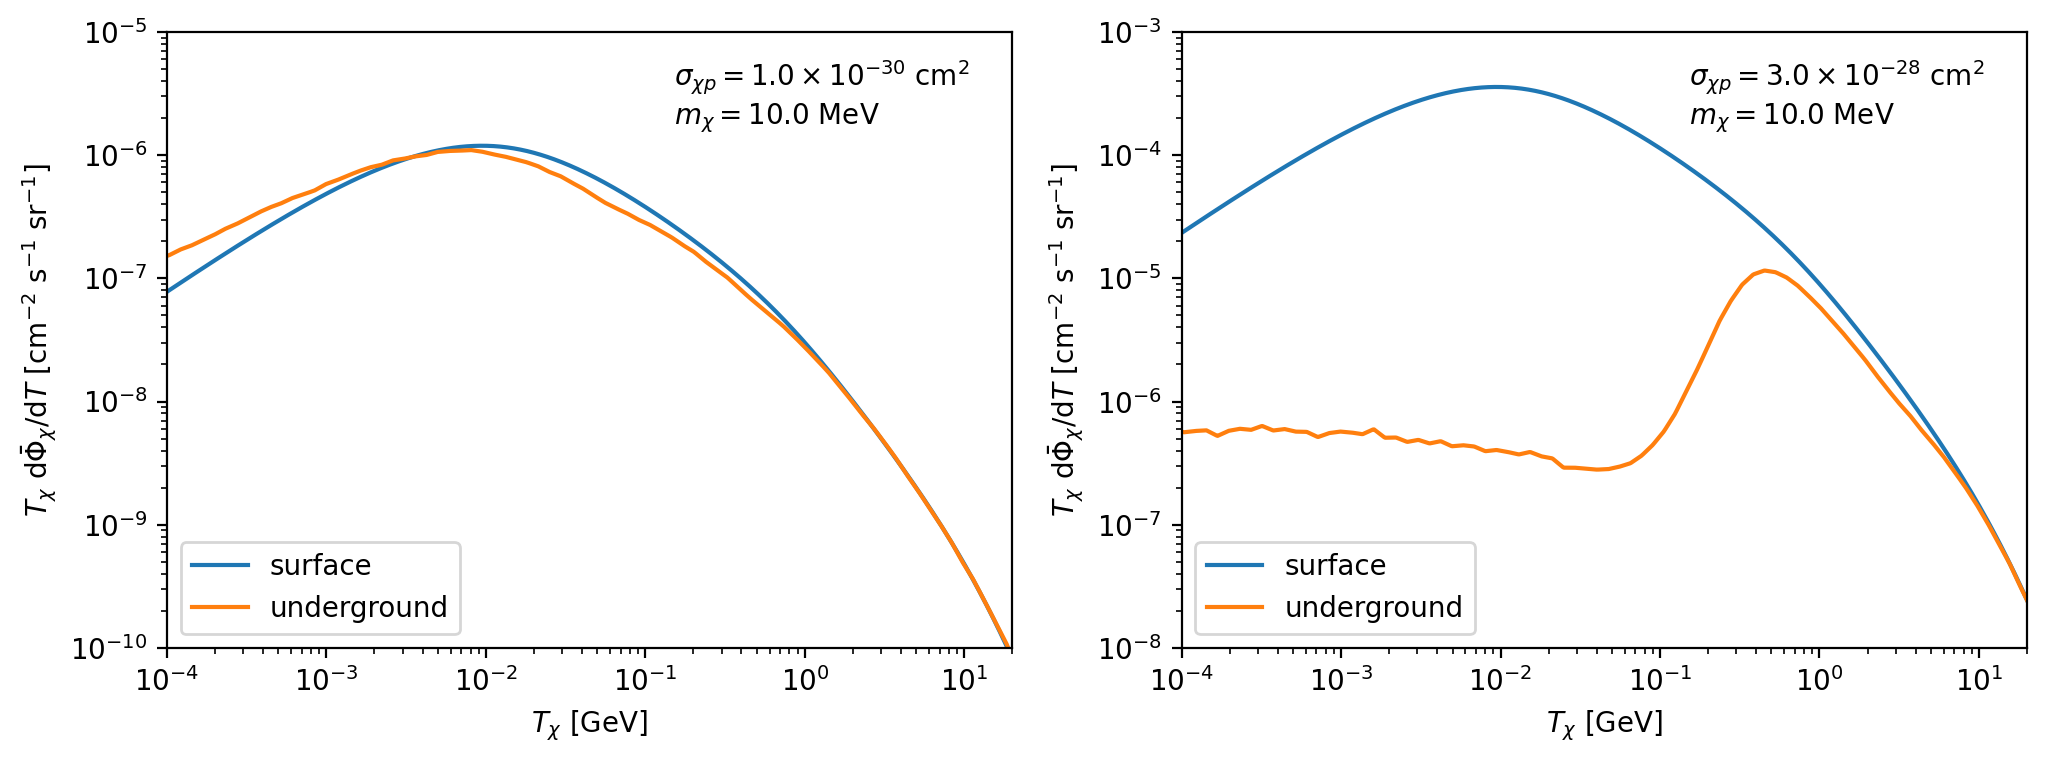
figure crdm-flux.png as shown in Fig. 1 will be generated, which corresponds to Fig. 5 in the paper [1].

Fig. 1 (crdm-flux.png) CRDM fluxes at the surface and 1.4 km underground.
Other Usages
For custom simulation or to implement new models, you can use the darkprop C++ library or the darkprop python package directly.
Building the documentation
To build this documentation locally, including HTML and PDF formats, one can set the
-DBUILD_DOCS=ON flag at cmake configuration. The documentation is generated using
Sphinx, doxygen,
breathe, and other extensions.
One way to install these dependencies is by creating a conda
environment with the docs/environment.yml file from the source,
$ conda env create -f environment.yml
Then activate the environment before cmake --build
$ conda activate darkpropdoc
Uninstallation
In the build directory where the cmake command was executed, type
$ cmake --build . --target uninstall